【さくらの VPS】Linux サーバーに ssh ログインしてみよう!
前書き
さくらの VPS で稼働している Linux サーバーに ssh ログインする方法について書いておきます。
前回の投稿で書いたところまで済ませると ssh で Linux サーバー (僕の場合は Ubuntu、以下サーバーと略すことあり) にログインする準備が整っている。
ssh ログインに必要な情報を用意してさっそくやってみよう。
ssh ログインに必要な情報
- サーバーの IP アドレス (グローバル IP アドレス)
- ssh ログインするユーザー (アカウント)
- ユーザーに設定したパスワード
以上が必要である。
さくらの VPS の Linux サーバーに ssh ログインする
サーバーの IP アドレスはコントロールパネルから簡単に確認できる。
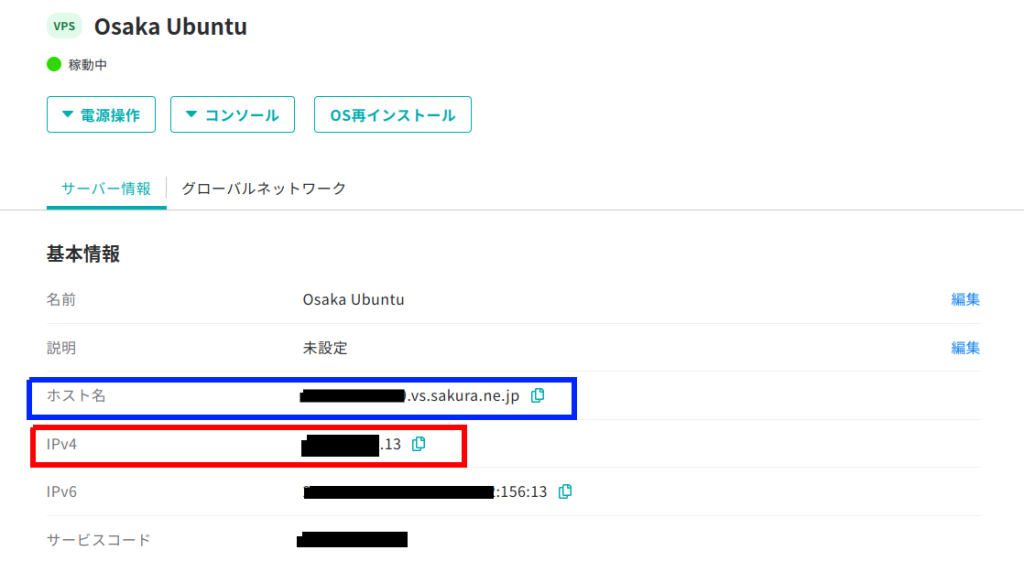
ssh ログインするときに、上記画像の青枠内のホスト名を使用しても構わない。今回は赤枠内の IP アドレス (IPv4 アドレス) を使用する形で進めます。
「どこ」からサーバーに ssh ログインするかは皆さんの使っているパソコン環境によって変わってくるでしょう。最近の僕は Chromebook か Linux (自宅パソコンにインストールした Ubuntu) から ssh することが多いです。MacBook Pro も時々といった感じです。
今回は Ubuntu パソコン (サーバーと区別するためこのように表記します) からサーバーに ssh ログインしてみます。
「端末」というアプリを起動させて以下のように ssh IP アドレス を実行します。※以下、IP アドレスは xx とか yy とかでぼかします。
nobi@CF-LX5:~$ ssh nobi@xx.yy.zz.13
The authenticity of host 'xx.yy.zz.13 (xx.yy.zz.13)' can't be established.
ECDSA key fingerprint is SHA256:lfLacf+JZ6EYpHAxA8+bBDO6rPfyPL3Qf3WGsilqsZA.
Are you sure you want to continue connecting (yes/no/[fingerprint])? yes
Warning: Permanently added 'xx.yy.zz.13' (ECDSA) to the list of known hosts.
nobi@xx.yy.zz.13's password:
Welcome to Ubuntu 20.04.4 LTS (GNU/Linux 5.4.0-110-generic x86_64)

* Documentation: https://help.ubuntu.com
* Management: https://landscape.canonical.com
* Support: https://ubuntu.com/advantage

System information as of Sat May 28 23:16:46 JST 2022

System load: 0.0 Processes: 112
Usage of /: 7.7% of 45.21GB Users logged in: 1
Memory usage: 20% IPv4 address for ens3: xx.yy.zz.13
Swap usage: 0%

* Super-optimized for small spaces - read how we shrank the memory
footprint of MicroK8s to make it the smallest full K8s around.

https://ubuntu.com/blog/microk8s-memory-optimisation

28 updates can be applied immediately.
To see these additional updates run: apt list --upgradable

*** System restart required ***

SAKURA internet [Virtual Private Server SERVICE]

Last login: Sat May 28 23:06:33 2022 from aa.bb.cc.241
$
はじめて ssh ログインするときは、4 行目に表示されている Are you sure you want to continue connecting と聞かれるが、yes と返してやれば良い。
パラパラといろんなメッセージが表示されているが、通常は気にするようなことはほとんどない。上記の例で言うなら
*** System restart required ***
だけは気にしといたほうがいいかなという感じだ。これは文字通りで「再起動が必要でっせ」というメッセージだ。多くの場合それほど神経質になることはなく、なるべく早めに再起動できるときに再起動させるようにすれば良いだろう。
その後パスワードを聞かれるので入力し、ユーザー名とパスワードの組み合わせが合っていれば無事ログインができる。
ログアウトするときは exit コマンドを実行すれば良い。
必要なら sudo 権限を付けておこう
ssh ログインするユーザーに sudo コマンドを実行する権限 (sudo 権限) をつけておきたいことも多いだろう。このタイミングで実行するのが良いと思うので紹介しておきます。
前回の記事でコンソール画面の操作方法を書きましたが、そのときに設定することもできました。しかし、僕はコンソール画面での設定作業は最小限にし、ssh ログインで各種設定 (初期設定も含む) をやるのが好きな派です。その方が作業がスムーズだからです。
sudo 権限をユーザーに付与するためには管理ユーザーになる必要があります。ubuntu という管理ユーザーがありますので、これに su – します。(ssh ログインしたまま実行します)
$ su - ubuntu
Password:
ubuntu@os3-3jj-525kk:~$
管理ユーザー ubuntu とそのパスワードがマッチすれば ubuntu に su (スイッチユーザー) できます。ここからが sudo 権限付与作業になります。
ここでは sudo 権限を付与する対象ユーザーを sudo というグループに追加することで実現させます。usermod コマンドを使います。
ubuntu@os3-3jj-525kk:~$ sudo usermod -aG sudo nobi
[sudo] password for ubuntu:
ubuntu@os3-3jj-525kk:~$
※usermod コマンド実行時に聞かれているのは管理ユーザー ubuntu のパスワードです。
ここで exit コマンドで、管理ユーザー ubuntu からもとのユーザーに戻り、さらに exit コマンドで ssh ログインを終了させます。ssh ログインを終了させずに sudo コマンドを実行しようとしても、以下のように実行できないためです。
ubuntu@os3-3jj-525kk:~$ exit
logout
$ sudo shutdown -r now
[sudo] password for nobi:
nobi is not in the sudoers file. This incident will be reported.
$ exit
Connection to xx.yy.zz.13 closed.
nobi@CF-LX5:~$
ssh ログインを終え、一回 ssh クライアント側 (Ubuntu パソコン) まで戻ってきました。ここから再度サーバーに ssh ログインします。
nobi@CF-LX5:~$ ssh nobi@xx.yy.zz.13
nobi@xx.yy.zz.13's password:
Welcome to Ubuntu 20.04.4 LTS (GNU/Linux 5.4.0-110-generic x86_64)

* Documentation: https://help.ubuntu.com
* Management: https://landscape.canonical.com
* Support: https://ubuntu.com/advantage

System information as of Sun May 29 00:03:30 JST 2022

System load: 0.0 Processes: 114
Usage of /: 7.7% of 45.21GB Users logged in: 1
Memory usage: 20% IPv4 address for ens3: xx.yy.zz.13
Swap usage: 0%

* Super-optimized for small spaces - read how we shrank the memory
footprint of MicroK8s to make it the smallest full K8s around.

https://ubuntu.com/blog/microk8s-memory-optimisation

28 updates can be applied immediately.
To see these additional updates run: apt list --upgradable

*** System restart required ***

SAKURA internet [Virtual Private Server SERVICE]

Last login: Sat May 28 23:16:46 2022 from aa.bb.cc.240
$
sudo 権限を要求される操作を sudo を付けずに実行してみます。
$ cd /var/log
$ ls -l syslog
-rw-r----- 1 syslog adm 364 May 29 00:03 syslog
$ cat syslog
cat: syslog: Permission denied
$
この例では /var/log/syslog ファイルを閲覧するために cat しようとしましたが拒否されました。
では、sudo を付けてやってみます。
$ sudo cat syslog
[sudo] password for nobi:
May 29 00:00:15 os3-326-52509 systemd[1]: logrotate.service: Succeeded.
May 29 00:00:15 os3-326-52509 systemd[1]: Finished Rotate log files.
May 29 00:00:15 os3-326-52509 systemd[1]: man-db.service: Succeeded.
May 29 00:00:15 os3-326-52509 systemd[1]: Finished Daily man-db regeneration.
May 29 00:03:30 os3-326-52509 systemd[1]: Started Session 325 of user nobi.
May 29 00:06:31 os3-326-52509 systemd[1]: Starting Daily apt download activities...
May 29 00:06:33 os3-326-52509 dbus-daemon[501]: [system] Activating via systemd: service name='org.freedesktop.PackageKit' unit='packagekit.service' requested by ':1.87' (uid=0 pid=81802 comm="/usr/bin/gdbus call --system --dest org.freedeskto" label="unconfined")
May 29 00:06:33 os3-326-52509 systemd[1]: Starting PackageKit Daemon...
May 29 00:06:33 os3-326-52509 PackageKit: daemon start
May 29 00:06:33 os3-326-52509 dbus-daemon[501]: [system] Successfully activated service 'org.freedesktop.PackageKit'
May 29 00:06:33 os3-326-52509 systemd[1]: Started PackageKit Daemon.
May 29 00:06:41 os3-326-52509 systemd[1]: apt-daily.service: Succeeded.
May 29 00:06:41 os3-326-52509 systemd[1]: Finished Daily apt download activities.
$
今度は /var/log/syslog ファイルの中身を見ることができました。sudo 権限を持っているユーザーだから閲覧が許可されたわけです。
![]()