[Peppermint] SoftEther VPN クライアントをインストールしてプロセスを起動させるところまで行う方法
まずはスペック確認。こんなペパーミント& PC です。
$ uname -a
Linux OptiPlex-755 3.16.0-77-generic #99~14.04.1-Ubuntu SMP Tue Jun 28 19:18:41 UTC 2016 i686 i686 i686 GNU/Linux
$ cat /etc/debian_version
jessie/sid
$ grep 'model name' /proc/cpuinfo
model name : Intel(R) Core(TM)2 Duo CPU E6750 @ 2.66GHz
model name : Intel(R) Core(TM)2 Duo CPU E6750 @ 2.66GHz
$ free -m
 total used free shared buffers cached
Mem: 3908 3620 287 201 112 2085
-/+ buffers/cache: 1421 2486
Swap: 3954 6 3948
$ sudo hdparm -I /dev/sda |head

/dev/sda:

ATA device, with non-removable media
 Model Number: WDC WD2500AAJS-75VWA0
 Serial Number: WD-WCARZ0559386
 Firmware Revision: 12.01B02
 Transport: Serial, SATA 1.0a, SATA II Extensions, SATA Rev 2.5
Standards:
 Supported: 8 7 6 5
$
CPU が Core 2 Duo、メモリーが 4 ギガ、DISK が Wester Digital の 250 GB ハードディスクです。
ネットワーク周りの情報も確認しておく
$ ifconfig
eth0 Link encap:Ethernet HWaddr 00:21:70:16:fb:1a
 UP BROADCAST MULTICAST MTU:1500 Metric:1
 RX packets:0 errors:0 dropped:0 overruns:0 frame:0
 TX packets:0 errors:0 dropped:0 overruns:0 carrier:0
 collisions:0 txqueuelen:1000
 RX bytes:0 (0.0 B) TX bytes:0 (0.0 B)
 Interrupt:21 Memory:fe9e0000-fea00000

eth1 Link encap:Ethernet HWaddr a4:71:74:69:7d:42
 inet6 addr: fe80::a671:74ff:fe69:7d42/64 Scope:Link
 UP BROADCAST RUNNING MULTICAST MTU:1500 Metric:1
 RX packets:51871 errors:0 dropped:2791 overruns:0 frame:0
 TX packets:28616 errors:0 dropped:0 overruns:0 carrier:0
 collisions:0 txqueuelen:1000
 RX bytes:61343504 (61.3 MB) TX bytes:2306940 (2.3 MB)

lo Link encap:Local Loopback
 inet addr:127.0.0.1 Mask:255.0.0.0
 inet6 addr: ::1/128 Scope:Host
 UP LOOPBACK RUNNING MTU:65536 Metric:1
 RX packets:4317 errors:0 dropped:0 overruns:0 frame:0
 TX packets:4317 errors:0 dropped:0 overruns:0 carrier:0
 collisions:0 txqueuelen:0
 RX bytes:410953 (410.9 KB) TX bytes:410953 (410.9 KB)

wlan0 Link encap:Ethernet HWaddr 34:76:c5:14:fd:2e
 inet addr:192.168.0.10 Bcast:192.168.0.255 Mask:255.255.255.0
 inet6 addr: fe80::3676:c5ff:fe14:fd2e/64 Scope:Link
 UP BROADCAST RUNNING MULTICAST MTU:1500 Metric:1
 RX packets:4541377 errors:0 dropped:0 overruns:0 frame:0
 TX packets:2875903 errors:0 dropped:0 overruns:0 carrier:0
 collisions:0 txqueuelen:1000
 RX bytes:2280325357 (2.2 GB) TX bytes:311166728 (311.1 MB)

$ netstat -rn
Kernel IP routing table
Destination Gateway Genmask Flags MSS Window irtt Iface
0.0.0.0 192.168.0.1 0.0.0.0 UG 0 0 0 wlan0
192.168.0.0 0.0.0.0 255.255.255.0 U 0 0 0 wlan0
$
IP アドレスとルーティングテーブルを見ておけば十分だと思うので上記 2 つのコマンドを実行した。いま使用しているインタフェースは wlan0、つまりこのパソコンは有線ではなく、 Wi-Fi で無線接続しているパソコンです。
SoftEther VPN クライアントをダウンロードする
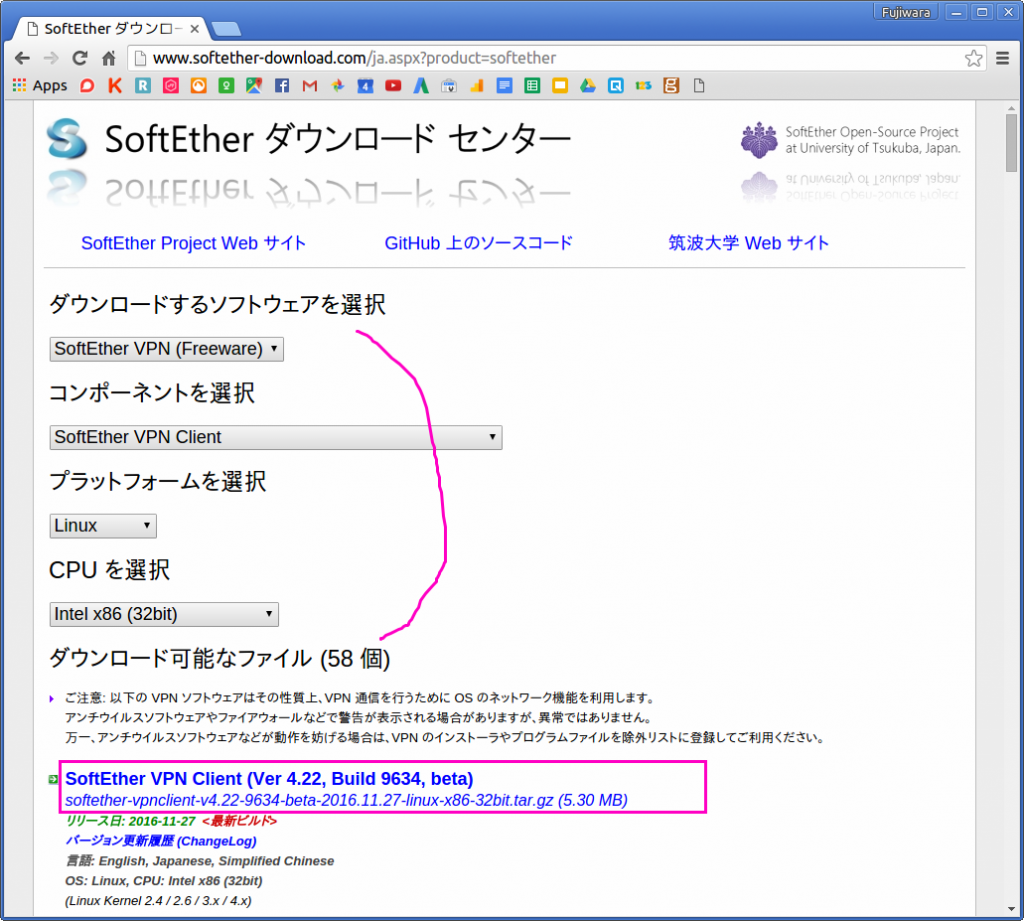
SoftEther VPN ダウンロードセンターから VPN クライアントをダウンロードしてきます。作業は /tmp ディレクトリで行うことにしました。
上記画像のピンクの四角で囲んだところを右クリックすると、リンクがコピーできるのでそれを wget に続けてタイプすれば以下のように実施できます。
$ cd /tmp
$ which wget
/usr/bin/wget
$ wget --spider http://jp.softether-download.com/files/softether/v4.22-9634-beta-2016.11.27-tree/Linux/SoftEther_VPN_Client/32bit_-_Intel_x86/softether-vpnclient-v4.22-9634-beta-2016.11.27-linux-x86-32bit.tar.gz
Spider mode enabled. Check if remote file exists.
--2017-05-08 20:32:16-- http://jp.softether-download.com/files/softether/v4.22-9634-beta-2016.11.27-tree/Linux/SoftEther_VPN_Client/32bit_-_Intel_x86/softether-vpnclient-v4.22-9634-beta-2016.11.27-linux-x86-32bit.tar.gz
Resolving jp.softether-download.com (jp.softether-download.com)... 130.158.75.49
Connecting to jp.softether-download.com (jp.softether-download.com)|130.158.75.49|:80... connected.
HTTP request sent, awaiting response... 200 OK
Length: 5560247 (5.3M) [application/x-gzip]
Remote file exists.

$ wget http://jp.softether-download.com/files/softether/v4.22-9634-beta-2016.11.27-tree/Linux/SoftEther_VPN_Client/32bit_-_Intel_x86/softether-vpnclient-v4.22-9634-beta-2016.11.27-linux-x86-32bit.tar.gz
--2017-05-08 20:32:31-- http://jp.softether-download.com/files/softether/v4.22-9634-beta-2016.11.27-tree/Linux/SoftEther_VPN_Client/32bit_-_Intel_x86/softether-vpnclient-v4.22-9634-beta-2016.11.27-linux-x86-32bit.tar.gz
Resolving jp.softether-download.com (jp.softether-download.com)... 130.158.75.49
Connecting to jp.softether-download.com (jp.softether-download.com)|130.158.75.49|:80... connected.
HTTP request sent, awaiting response... 200 OK
Length: 5560247 (5.3M) [application/x-gzip]
Saving to: ‘softether-vpnclient-v4.22-9634-beta-2016.11.27-linux-x86-32bit.tar.gz’

100%[======================================>] 5,560,247 356KB/s in 33s

2017-05-08 20:33:05 (165 KB/s) - ‘softether-vpnclient-v4.22-9634-beta-2016.11.27-linux-x86-32bit.tar.gz’ saved [5560247/5560247]

$ echo $?
0
$
これで VPN クライアントがダウンロードできました。
ペパーミントの開発環境を整える
SoftEther VPN クライアントをインストールする前に開発環境を整えておきます。インストール作業では make を実行するので build-essential というパッケージをインストールしておきます。
$ aptitude show build-essential
Package: build-essential
State: not installed
Version: 11.6ubuntu6
Priority: optional
Section: devel
Maintainer: Ubuntu Developers <ubuntu-devel-discuss@lists.ubuntu.com>
Architecture: i386
Uncompressed Size: 37.9 k
Depends: libc6-dev | libc-dev, gcc (>= 4:4.4.3), g++ (>= 4:4.4.3), make, dpkg-dev (>= 1.13.5)
Description: Informational list of build-essential packages
 If you do not plan to build Debian packages, you don't need this package. Starting with dpkg (>= 1.14.18) this package is required
 for building Debian packages.

 This package contains an informational list of packages which are considered essential for building Debian packages. This package
 also depends on the packages on that list, to make it easy to have the build-essential packages installed.

 If you have this package installed, you only need to install whatever a package specifies as its build-time dependencies to build the
 package. Conversely, if you are determining what your package needs to build-depend on, you can always leave out the packages this
 package depends on.

 This package is NOT the definition of what packages are build-essential; the real definition is in the Debian Policy Manual. This
 package contains merely an informational list, which is all most people need. However, if this package and the manual disagree, the
 manual is correct.

$ sudo apt-get install build-essential
[sudo] password for nobi:
Reading package lists... Done
Building dependency tree
Reading state information... Done
The following packages were automatically installed and are no longer required:
 libspeechd2 linux-headers-3.16.0-37 linux-headers-3.16.0-37-generic
 linux-headers-3.16.0-46 linux-headers-3.16.0-46-generic
 linux-image-3.16.0-37-generic linux-image-3.16.0-46-generic
 linux-image-extra-3.16.0-37-generic linux-image-extra-3.16.0-46-generic
Use 'apt-get autoremove' to remove them.
The following extra packages will be installed:
 dpkg-dev fakeroot g++ g++-4.8 gcc gcc-4.8 libalgorithm-diff-perl
 libalgorithm-diff-xs-perl libalgorithm-merge-perl libasan0 libc-dev-bin
 libc6-dev libdpkg-perl libfakeroot libfile-fcntllock-perl libgcc-4.8-dev
 libitm1 libstdc++-4.8-dev linux-libc-dev make manpages manpages-dev
Suggested packages:
 debian-keyring g++-multilib g++-4.8-multilib gcc-4.8-doc libstdc++6-4.8-dbg
 gcc-multilib autoconf automake1.9 libtool flex bison gdb gcc-doc
 gcc-4.8-multilib gcc-4.8-locales libgcc1-dbg libgomp1-dbg libitm1-dbg
 libatomic1-dbg libasan0-dbg libtsan0-dbg libquadmath0-dbg glibc-doc
 libstdc++-4.8-doc make-doc
The following NEW packages will be installed:
 build-essential dpkg-dev fakeroot g++ g++-4.8 gcc gcc-4.8
 libalgorithm-diff-perl libalgorithm-diff-xs-perl libalgorithm-merge-perl
 libasan0 libc-dev-bin libc6-dev libdpkg-perl libfakeroot
 libfile-fcntllock-perl libgcc-4.8-dev libitm1 libstdc++-4.8-dev
 linux-libc-dev make manpages manpages-dev
0 upgraded, 23 newly installed, 0 to remove and 1 not upgraded.
Need to get 31.8 MB of archives.
After this operation, 79.7 MB of additional disk space will be used.
Do you want to continue? [Y/n] y
Get:1 http://jp.archive.ubuntu.com/ubuntu/ trusty-updates/main libasan0 i386 4.8.4-2ubuntu1~14.04.3 [64.0 kB]
Get:2 http://jp.archive.ubuntu.com/ubuntu/ trusty-updates/main libitm1 i386 4.8.4-2ubuntu1~14.04.3 [28.5 kB]
Get:3 http://jp.archive.ubuntu.com/ubuntu/ trusty/main manpages all 3.54-1ubuntu1 [627 kB]
Get:4 http://jp.archive.ubuntu.com/ubuntu/ trusty-updates/main libc-dev-bin i386 2.19-0ubuntu6.11 [63.4 kB]
Get:5 http://jp.archive.ubuntu.com/ubuntu/ trusty-updates/main linux-libc-dev i386 3.13.0-117.164 [768 kB]

(中略)

Setting up libalgorithm-diff-xs-perl (0.04-2build4) ...
Setting up libalgorithm-merge-perl (0.08-2) ...
Setting up libfile-fcntllock-perl (0.14-2build1) ...
Setting up manpages-dev (3.54-1ubuntu1) ...
Processing triggers for libc-bin (2.19-0ubuntu6.11) ...
$
これでペパーミントの開発環境が整いました。さきほどダウンロードした SoftEther VPN クライアントを解凍してインストールしていきます。
SoftEther VPN クライアントを解凍してインストールする
次にダウンロードしてきた VPN クライアントを tar で解凍します。解凍すると vpnclient というディレクトリができますのでそこで make を実行します。
$ ls -l softether*
-rw-rw-r-- 1 nobi nobi 5560247 11月 27 15:50 softether-vpnclient-v4.22-9634-beta-2016.11.27-linux-x86-32bit.tar.gz
$ tar zxvf softether-vpnclient-v4.22-9634-beta-2016.11.27-linux-x86-32bit.tar.gz
vpnclient/
vpnclient/Makefile
vpnclient/.install.sh
vpnclient/ReadMeFirst_License.txt
vpnclient/Authors.txt
vpnclient/ReadMeFirst_Important_Notices_ja.txt
vpnclient/ReadMeFirst_Important_Notices_en.txt
vpnclient/ReadMeFirst_Important_Notices_cn.txt
vpnclient/code/
vpnclient/code/vpnclient.a
vpnclient/code/vpncmd.a
vpnclient/lib/
vpnclient/lib/libcharset.a
vpnclient/lib/libcrypto.a
vpnclient/lib/libedit.a
vpnclient/lib/libiconv.a
vpnclient/lib/libintelaes.a
vpnclient/lib/libncurses.a
vpnclient/lib/libssl.a
vpnclient/lib/libz.a
vpnclient/lib/License.txt
vpnclient/hamcore.se2
$ ls -l vpnclient
total 1464
-rwxrwxr-x 1 nobi nobi 2784 11月 27 15:50 Authors.txt
drwxrwxr-x 2 nobi nobi 4096 11月 27 15:50 code
-rwxrwxr-x 1 nobi nobi 1296225 11月 27 15:50 hamcore.se2
drwxrwxr-x 2 nobi nobi 4096 11月 27 15:50 lib
-rwxrwxr-x 1 nobi nobi 2865 11月 27 15:50 Makefile
-rwxrwxr-x 1 nobi nobi 30801 11月 27 15:50 ReadMeFirst_Important_Notices_cn.txt
-rwxrwxr-x 1 nobi nobi 36296 11月 27 15:50 ReadMeFirst_Important_Notices_en.txt
-rwxrwxr-x 1 nobi nobi 50695 11月 27 15:50 ReadMeFirst_Important_Notices_ja.txt
-rwxrwxr-x 1 nobi nobi 58932 11月 27 15:50 ReadMeFirst_License.txt
$ cd vpnclient
$ ls -l
total 1464
-rwxrwxr-x 1 nobi nobi 2784 11月 27 15:50 Authors.txt
drwxrwxr-x 2 nobi nobi 4096 11月 27 15:50 code
-rwxrwxr-x 1 nobi nobi 1296225 11月 27 15:50 hamcore.se2
drwxrwxr-x 2 nobi nobi 4096 11月 27 15:50 lib
-rwxrwxr-x 1 nobi nobi 2865 11月 27 15:50 Makefile
-rwxrwxr-x 1 nobi nobi 30801 11月 27 15:50 ReadMeFirst_Important_Notices_cn.txt
-rwxrwxr-x 1 nobi nobi 36296 11月 27 15:50 ReadMeFirst_Important_Notices_en.txt
-rwxrwxr-x 1 nobi nobi 50695 11月 27 15:50 ReadMeFirst_Important_Notices_ja.txt
-rwxrwxr-x 1 nobi nobi 58932 11月 27 15:50 ReadMeFirst_License.txt
$ sudo make
[sudo] password for nobi:
--------------------------------------------------------------------

SoftEther VPN Client (Ver 4.22, Build 9634, Intel x86) for Linux Install Utility
Copyright (c) SoftEther Project at University of Tsukuba, Japan. All Rights Reserved.

--------------------------------------------------------------------


Do you want to read the License Agreement for this software ?

 1. Yes
 2. No

Please choose one of above number:
1

(中略)

Did you read and understand the License Agreement ?
(If you couldn't read above text, Please read 'ReadMeFirst_License.txt'
 file with any text editor.)

 1. Yes
 2. No

Please choose one of above number:
 1


Did you agree the License Agreement ?

1. Agree
2. Do Not Agree

Please choose one of above number:
1

(中略)

VPN Server Manager for Mac OS X works perfectly as same as the traditional Windows versions. It helps you to completely and easily manage the VPN server services running in remote hosts.

--------------------------------------------------------------------

make[1]: Leaving directory `/tmp/vpnclient'
$
make が無事完了したら、作業ディレクトリである /tmp から /usr/local に移動させます。そして root 権限がないとあれこれ実行できないように、chmod と chown でパーミッション設定を変更しておきます。
$ cd ..
$ pwd
/tmp
$ ls -ld vpnclient/
drwxrwxr-x 4 nobi nobi 4096 5月 8 21:56 vpnclient/
$ sudo mv vpnclient/ /usr/local
$ ls -l /usr/local/vpnclient/
total 8720
-rwxrwxr-x 1 nobi nobi 2784 11月 27 15:50 Authors.txt
drwxrwxr-x 2 nobi nobi 4096 5月 8 21:56 code
-rwxrwxr-x 1 nobi nobi 1296225 11月 27 15:50 hamcore.se2
drwxrwxr-x 2 nobi nobi 4096 5月 8 21:56 lib
-rwxrwxr-x 1 nobi nobi 2865 11月 27 15:50 Makefile
-rwxrwxr-x 1 nobi nobi 30801 11月 27 15:50 ReadMeFirst_Important_Notices_cn.txt
-rwxrwxr-x 1 nobi nobi 36296 11月 27 15:50 ReadMeFirst_Important_Notices_en.txt
-rwxrwxr-x 1 nobi nobi 50695 11月 27 15:50 ReadMeFirst_Important_Notices_ja.txt
-rwxrwxr-x 1 nobi nobi 58932 11月 27 15:50 ReadMeFirst_License.txt
-rwxr-xr-x 1 root root 3713946 5月 8 21:56 vpnclient
-rwxr-xr-x 1 root root 3713888 5月 8 21:56 vpncmd
$ sudo chmod 600 *
$ sudo chmod 700 vpncmd
$ sudo chmod 700 vpnclient
$ sudo chown root:root *
$ ls -l
total 8736
-rw------- 1 root root 2784 11月 27 15:50 Authors.txt
drw------- 2 root root 4096 5月 8 22:05 backup.vpn_client.config
drw------- 2 root root 4096 5月 8 22:05 client_log
drw------- 2 root root 4096 5月 8 21:56 code
-rw------- 1 root root 1296225 11月 27 15:50 hamcore.se2
-rw------- 1 root root 867 5月 8 22:05 lang.config
drw------- 2 root root 4096 5月 8 21:56 lib
-rw------- 1 root root 2865 11月 27 15:50 Makefile
-rw------- 1 root root 30801 11月 27 15:50 ReadMeFirst_Important_Notices_cn.txt
-rw------- 1 root root 36296 11月 27 15:50 ReadMeFirst_Important_Notices_en.txt
-rw------- 1 root root 50695 11月 27 15:50 ReadMeFirst_Important_Notices_ja.txt
-rw------- 1 root root 58932 11月 27 15:50 ReadMeFirst_License.txt
-rwx------ 1 root root 3713946 5月 8 21:56 vpnclient
-rw------- 1 root root 1332 5月 8 22:28 vpn_client.config
-rwx------ 1 root root 3713888 5月 8 21:56 vpncmd
$
ここまででインストール作業が終了。次は VPN クライアントを動かしてみましょう。
SoftEther VPN クライアントを起動する
$ cd /usr/local/vpnclient
$ ps -ef | grep vpn
nobi 15244 3304 0 22:05 pts/3 00:00:00 grep --colour=auto vpn
$ sudo ./vpnclient start
The SoftEther VPN Client service has been started.
$ ps -ef | grep vpn
root 15249 1 0 22:05 ? 00:00:00 /usr/local/vpnclient/vpnclient execsvc
root 15250 15249 2 22:05 ? 00:00:00 /usr/local/vpnclient/vpnclient execsvc
nobi 15258 3304 0 22:05 pts/3 00:00:00 grep --colour=auto vpn
$
これで VPN クライアントのプロセスが起動しました。
長くなりそうなのでここで一回切ります。この続き = VPN クライアントの設定は次の記事で書きます。